*Please note: all recommendations in this post are based on our positive experience, with no benefits or compensation of any kind in return.
Using a shed frame to build a ‘proper’ house is very do-able, and in our opinion is a fantastic, budget-friendly alternative to conventional building methods.
We expected going in that there might be some technical challenges unique to using a shed frame – we just didn’t know exactly what they would be! Our approach was to try and anticipate as many of them as possible while we were still in the planning process, and later, to find solutions that minimised unwanted flow-on effects, which the examples below will illustrate.
Ultimately we believe we only had as many challenges to solve as any conventional build would – and we’re really happy with the results.
Here are a few points to consider in the planning phase to help your building process go smoothly.
1. Shed supplier: it’s worth taking some time to choose your shed supplier carefully. When we were researching shed suppliers and reading other people’s blogs about building shed houses, we came across lots of horror stories of inferior products, zero after-sale assistance or issue resolution, and time and money wasted to rectify the problems that arose as a result.
So based on that, and on the advice of people we knew who had blazed the shed house trail before us, we steered clear of the cheap internet options and went with MA Steel in Yass, who provided exceptional customer service and a great product.
Some of the benefits we found invaluable were:
- we could physically go and chat with them and see what the shed structure would look like
- they understood what we were trying to achieve and had experience in shed house builds
- they were enthusiastic about assisting us with our project, willing to talk through lots of different options, patient with our lack of knowledge and happy to let us make endless changes and amendments before finalising our order
- when some minor delivery issues arose with a third-party supplier during the build, MA Steel sorted them out swiftly
- when we needed custom capping for our ceiling apex, MA Steel were able to manufacture and deliver it within a short time frame.
While you may be thinking, ‘Well, of course they should provide all that!’, it was our experience that not all shed suppliers are interested or enthusiastic about spending their time helping customers that need a product that’s not straight out of the box. They really just want to sell you a standard kit and move on. Maybe this wouldn’t be an issue for customers with building or other trade experience, or those who are happy to end up with a very basic finish, but for us it was absolutely worth the slightly higher price tag to get the planning assistance and service we got from MA Steel.
In addition to the service we received, we were very happy with the quality and robustness of the frame. We’d heard plenty of stories of how ‘noisy’ steel frames can be, and I don’t know if the steel quality, design or fixtures make a difference, but we have not had this experience.
2. Lining the inside: if you look at the structure of a shed frame, with large vertical c-sections and horizontal girts sitting behind them, you can easily see that you are not starting out with a flat surface. You’ll need to decide whether to box in the c-sections, which will maximise your floor space, or make the entire wall thicker to hide them and have a flat wall. Depending on your floor plan this choice might impact your layout; for example, you can’t have kitchen cabinetry or your oven running across a boxed in c-section. We wanted to hide the c-sections to keep our floor plan flexible and create the internal aesthetic of a conventional build.
Our solution was to design the floor plan with the shed ‘bays’ in mind. It made sense to put the vertical c-sections where we wanted internal dividing walls to go wherever possible, and then specify the bay sizes to the shed manufacturer when we ordered the shed kit, to fit the room sizes we wanted and reduce the number of c-sections that we needed to hide.
You can see below that we divided the shed into four bays: 4.2m (4200mm) for the bedrooms, 3.6m for the bathroom/laundry, and two bays of 2.7m each in the kitchen area.
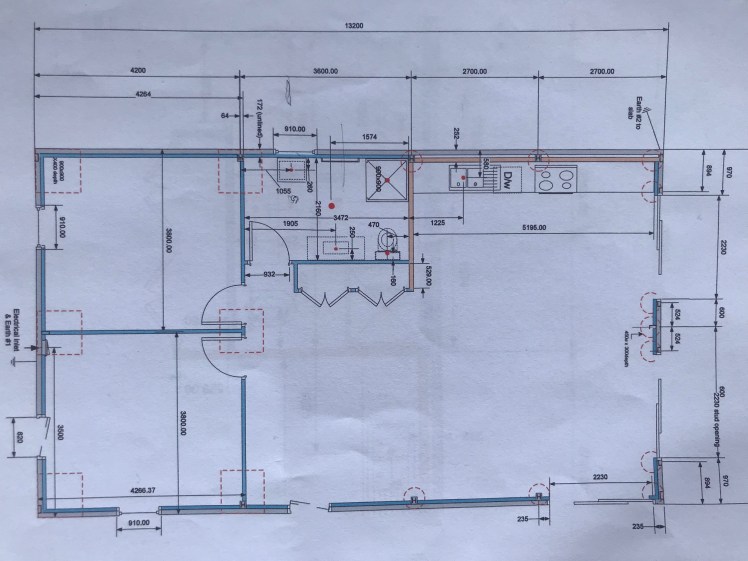
Consult your shed supplier about bay width limits, and consider that very wide bays might increase the price of the shed due to the additional steel structure needed to span the space. This also applies to your shed dimensions – we went with a width of 7.6m, as the price hiked beyond that due to the higher steel requirements.
It’s also worth noting that not all sheds are built the same way: for example, the size and ‘direction’ of the c-sections may vary (i.e. the c-section may be side-on to the wall, or have its back flat against the wall), they may use ‘top hats’ or ‘zeds’ for the horizontals, etc.
You don’t need to have lots of technical knowledge about these (I clearly don’t!) – just be aware that there are different options and speak to your shed supplier about them. Your choices will impact how thick your walls will be, and your options for building the framework to attach your chosen internal lining to. We used gyprock, and built an internal timber framework to attach it to. I believe there are also steel battens that can be used instead of timber; we went with timber because we felt comfortable working with it.
Another benefit of the timber framing was that it provided the structure for the insulation to sit in, just like a ‘normal’ house. Some people use plywood panels for their lining, and I think these can be screwed straight to the shed frame, but we didn’t like the aesthetic, we’d heard it can be a lot of fiddly work to get a really good finish, and it doesn’t give you anything to attach insulation to.
It’s worth spending some time talking with your shed supplier, and preferably looking at a shed they’ve built, to get a good visual of the frame structure you’ll have to work with. When we discovered that sheds could be built in multiple ways, we chose the method and materials that minimised how far the vertical c-sections protruded out into the room, and that also gave us flat surfaces on the horizontals to attach the timber framework to (i.e. ‘zeds’ rather than ‘top hats’).
3. Communicating expectations: sheds that are being used as sheds don’t need to be perfectly square. However, having a perfectly square frame makes it MUCH easier to fit windows and build straight internal walls. Our error was to keep referring to our build as ‘the shed’ rather than ‘the house’, and failing to communicate the kind of finish we were trying to achieve. Having a conversation with the shed frame builder at the start, and potentially paying a bit more for the extra time required to square things up would have saved us a lot of time at the other end of the process. Being ‘a little bit out’ had lots of unforeseen flow-on effects for us: it made very fiddly and time-consuming work of fitting and sealing around the windows and doors, and getting a good finish on architraves and cornices. It also meant that gyprocking took longer with sheets needing to be trimmed, and a more complex bathroom tiling job because the room wasn’t perfectly square.
Having said all that – the little imperfections are probably only visible to us! And with more skill and experience working with timber, the architraves would have been less of a challenge for me to get right.
4. Other parts of the shed structure: we were advised by our shed supplier that we needed to nominate at least two bays (on different walls) to place extra supports in the walls to meet structural bracing requirements. These would run diagonally from floor to ceiling. Fine, we thought – until we tried to find two sections of wall that didn’t have a door or window in them! It ultimately didn’t impact our layout, but did affect the size and placement of a window.
5. Slab work: following on from the previous point, we weren’t able to provide exact measurements for things such as the location of pipework and where to recess the bathroom floor, because we didn’t know exactly how thick our walls would end up being. We had a solid theory about how best to attach the internal timber framework to the shed structure, but we weren’t confident that we were spot on and were waiting to see it in the flesh. So we had a chat with our plumber to determine how much leeway we had with the measurements of pipe locations, and on his advice chose a toilet and appliances that provided some flexibility with pipe placement. It all turned out fine; the only minor issue was that the centrally-placed shower drain ended up being slightly off centre. This could have been avoided by using a channel drain.
6. External door and window frames: if you decide to make the walls thicker to hide the vertical c-sections rather than boxing around them, you need to resolve how the door frames will fit in that wall. Standard door frames are too narrow to cover the wall cavity from outside wall to inside wall, so you need to decide how to finish these off; for example with plaster work (gyprock), wider timber architraves, etc. It’s an easily-solved issue, just something to think about when you’re planning and costing things (and before you go out and buy all your external doors and windows!).
7. Doors and windows: we wanted proper residential-quality windows and external doors. Using these in a shed frame requires extra steel framing as well as flashing, and some ‘modifications’ to the underneath of the sliding doors to get them to fit and be waterproof. We consulted with our shed supplier, concreter and the shed installer, figured out what was required and made sure everyone was in agreement on the solution, which was for the concreter to put in slab recesses on the edge of the slab for the sliding door sills, and the installer to add additional structure around the windows and doors, and custom flashing to the tops of them to keep water from getting into the wall cavity.
8. Shed frame surprise: we only realised when we were standing inside our newly-erected shed, that there were enormous bolts sticking out one side of a huge horizontal c-section that runs across the shed above the bedroom doors and supports the floor of the mezzanine level (which we put in to provide flat ceilings in the bedrooms and create a storage space above). To solve the question of how to attach gyprock, we needed to choose between a super-thick wall between the bedrooms and bathroom/living area, or boxing around the bolts. We chose the latter to save time, money, labour and materials. In hindsight, a thicker wall would have looked better, but ultimately the two affected rooms will become the office and the guest bedroom when we build the main house, so with our deadline looming and our bank account haemorrhaging, we decided to be pragmatic.
9. Ceilings: we opted to put in a mezzanine level over the bedrooms to give us a storage space above and normal ceilings in the bedrooms below, and we left the remainder of the house, apart from the bathroom, as raked ceilings. The below picture shows the two bedrooms straight ahead under the mezzanine area, and to the right of those is the bathroom door. It gives you an idea of how we eventually resolved our need for a ceiling over the bathroom (i.e. with a lot of gyprock! and a cavity behind it above the bathroom).
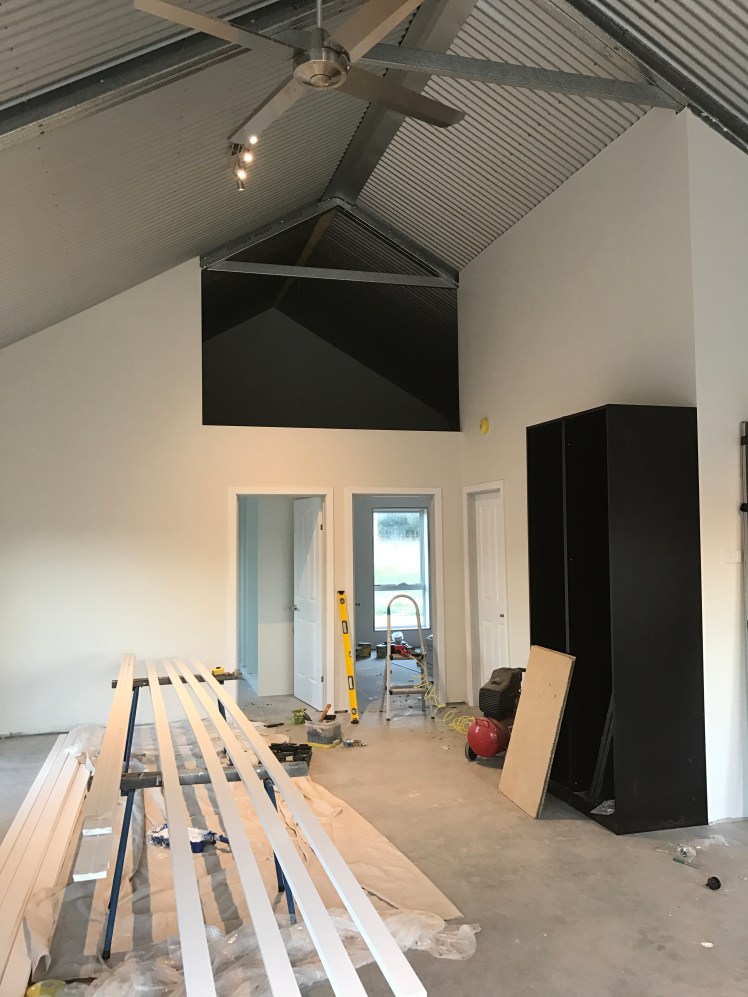
This allowed us to have normal ceiling lights and fans in the bedrooms and bathroom.
The main ceiling challenge to solve was how we would line the raked ceilings. Initially we’d assumed that we would use gyprock, but when we realised how high they were (3m at the tops of the walls and 5.5m at the peak), we realised that getting sheets up there efficiently and without breaking them would be fraught with issues. Zincalume became the obvious alternative. We used scaffolding for most of that work but in the end needed a scissor lift to finish it off at the peak.
In case you were wondering why the ceilings were quite so high… this goes back to our decision to have a mezzanine storage area above the bedrooms. If we had used standard 2.7m high walls for the shed, we would hardly have had room to stand up in the mezzanine. So we made the shed walls 3m high and kept the bedroom ceiling height at 2.4m (the minimum allowed) to give us some decent space above. The flow on effect, of course, was the eventual raked ceiling height, which we love – but which took four people several days to line.
Ultimately, even in hindsight we realised that it’s impossible to anticipate every little ‘hiccup’ that might arise and, from speaking with others, I believe this is the case for every building process – not just unconventional builds. Well, maybe there are a couple extra for the unconventional ones!
I guess the litmus test is whether we would do it all again, knowing what we know now, and with the benefit of a crystal ball? and the answer to that is yes! With good planning and the priceless benefit of conversations with people that had the knowledge, skills or experience that we didn’t have, we ended up with a fantastic home that exactly fits our needs and that we love living in, all within a limited budget and a tight time-frame.

Fantastic. Very useful for our own endeavour. I’m still at the decision making stage. Do we go with a shed like yours or a cheap steel framed home kit!
LikeLike
We faced the same dilemma Judy! There are so many factors to consider, and pro’s and con’s for every option. For us, it came down to aesthetics, cost, and ability to merge with the main house (which I know may not be a factor for you). I’m aiming to get my next post on Costs out over the weekend. Hopefully that will be useful for your decision making! Cheers, Kirsty
LikeLike
Thank you Kirsty for the very informative article. Unlike your situation, we’re working with an existing (14 year old) shed so some of the modifications you did at design stage are not possible for our project. What is it that you did for the sliding door modifications to waterproof at ground level? I’d rather avoid having a “hob” to establish a water barrier.
LikeLike
Hello Axiomatic,
My sincere apologies for missing your comment almost a year ago! I’d imagine you are finished your shed project now, and I hope you are happy with the result. I’m not sure I could have been helpful with your query re the sliding doors – I don’t think our end result was ideal and I still don’t know what the alternative is. We had a lower ledge along the edge of the slab for the door frame to sit on, which left an unsightly narrow gap on the inside between the frame and the internal concrete and was forever filling with dirt and debris. Did you come up with a good solution for yours?
All the best!
Kind regards
Kirsty
LikeLike